Wednesday, June 27, 2012

Posting No. 53 - Patience Rewarded!

I got an email last night from Kevin with attachments - yes, pictures of Grandpa Sam's place on his layout.  Here are some excerps from his email:

Hey buddy!

Remember me? LOL  Sorry it has taken so long to get back to you, but like you said, "life happens". Things have been crazy and I had hoped to get the total scene completed, but this should give you and the followers of your construction blog a general idea of where and how Grandpa Sam's Place will be on the layout. To the rear I plan to model a barn/out building type of structure. In one of the pics, you can see a hint of the Wolf River which sweeps through a narrow gorge bordering Sam's property. Lots more to do before I give a full reveal of that though! :)

Once again, I can't thank you enough for the awesome job on this structure! IT is going to be a highlight for sure! I have a thank you I'm working on you will be receiving in the not too distant future. With your permission I was going to put a small teaser on MRH forums to head to your construction blog for the rest of these pictures. Kevin.

All I can say is WOW!  Kevin has done his usual wonderful job and I love what he's done!  Click on any picture for a larger view of all pictures


Thanks, Kevin for the pictures and the opportunity to be a small part of your awesome layout!

Thursday, June 21, 2012

Posting No. 52 - Patience!

I got an email from Kevin today.  He wanted to reassure me that he hadn't forgotten about pictures, but that his life is very busy at the moment.  That's just like Mr. Murphy - when you're anxious to get something done he throws a bunch of "life" at you!

Thank you Kevin my friend for the update.  We will just be patient and look forward to your pictures!

Tuesday, June 19, 2012

Posting No. 51 - It Arrived!

I received the following email from Kevin on Monday, June 11th:

"Grandpa Sam's just arrived here tonight and I just finished unpacking it! I am happy to report no borken pieces!!!! It must have had a slight jar or two to the rear of the structure as both the stairs off of the rear porch and the cellar doors were loose, but undamaged! Wonderful job packing and the instructions were VERY helpful! My wife and I are so impressed with the quality of workmanship and the way it looks. It reminds me very much of my grandfather's farmhouse. The extra details you added are going to be perfect sitting on the front porch! And even a 12 volt power supply! YOu are too much my friend!"

That is great news!  Once Kevin provides pictures of Grandpa Sam's place on his layout I'll post them here (with his permission).


Friday, June 8, 2012

Posting No. 50 - Christmas in June

Well, the package is on the way to Kevin and is scheduled to arrive Monday, June 11. I only wish I was there to see Kevin open and unpack Grandpa Sam's place! I've had such fun doing the project and communicating with Kevin during the build. I've learned a great deal from the build which I will use in future projects. Kevin has been busy preparing a place for the structure on his layout and I can't wait to see it installed! With Kevin's permission I'm going to post his pictures here. I feel like a kid at Christmas waiting to see those pictures!

Saturday, June 2, 2012

Posting No. 49 - I'm boxing!

No, not that kind of boxing! - I'm boxing up the structure for shipment.  I start by using an oversize box and lining the bottom and sides with 2" foam board.  I hot glued the foam board together to make it stronger.  I want this box "armored" to withstand harsh handling.


I've added toothpicks in the bottom piece of foam spaced to the inside 4 corners of the structure to hold it in place.  The cutout is for the wire used for the interior lighting.


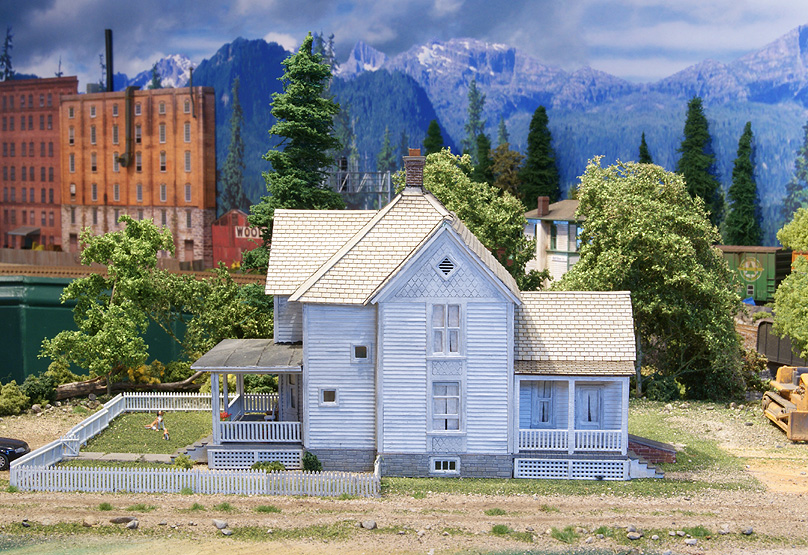
Here's the structure set in place on the bottom over the alignment toothpicks.


Now I'll need to hold the structure down gently while also allowing space above it to allow for any crushing of the box.  Here is the foam rubber that I'll use and some small dowel rods.


I cut pieces of the foam rubber to go over the roof peaks and then I cut the dowels to length to allow them to fit in the side walls.  Next I set the foam rubber pieces on the roof peaks and insert the dowels to bow slightly to apply gentle pressure on the foam.  I hot glue everything in place so that it won't shift during shipment.  I still have plenty of clearance above the structure that will be empty.


It's important that the dowels be removed gently so as to not damage the structure.  I add tape with instructions to cut the dowels out with wire cutters.


With the structure firmly in place I add the accessory pack by putting a dab of hot glue on it and gluing it to the bottom piece of foam.


Next I secure the lighting transformer.  If this bad boy got loose and rattled around it the box it could do a great deal of damage.  I insert it in a Ziploc bag and hot glue the bag to the bottom and sides of the container.  I also add dowels to add extra protection just in case the bag comes loose.


I don't want the top of those dowels coming loose so a add a corner foam reinforcement hot glued in place.


I want to make sure that the top of the box is "cave-in proof" so I add a 1" x 2" piece of wood reinforcement set into the foam sides.


Now I need something sturdy for the top insert piece so I use some double thickness cardboard.


Here I've cut it to size and inserted it into the top of the box.  I don't have pictures of the next steps, but I tape a Ziploc back the the inside top piece with unpacking instructions, the kit instructions, and a letter to Kevin.  I seal the whole thing up and put Kevin's address on it. 

Man, I never thought it would take so much to pack this, but I want to make sure that it arrives undamaged.  The delivery people would have to drop it from an airplane or run over it with the truck to mess this up!

Kevin, I'll email you with the shipping information!  I'm hoping to have a future posting showing Grandpa's place on Kevin's layout once installed.  Thanks for watching!

Post No. 48 - The Great Outdoors!

With the house completed I wanted some outdoor shots.  I did some quick & dirty just to have something to remember the structure by since it's off to Kevins!


The background is from an area about 4 miles from my house that is a horse farm.  It was a nice cloudy day which actually makes shooting better not dealing with shadows.


Next steps: Packing and shipping!

Wednesday, May 30, 2012

Posting No. 47 - Give Me Some Static!

Static grass, that is.  I'm taking the time to build a little diorama for photos before I ship this off to Kevin.  I don't plan on sending the diorama to Kevin, but will keep it for future photos.  I started by shaping a piece of 2" thick foam, painted it earth color, and glued on a mixture of ground foams.

What is the white piece of paper on the foam?  It's cut out as the shape of the structure so that when it is removed the structure will "nestle down" on the foam rather than sitting on top of the static grass.  If I don't do this I have to end up scraping away the static grass in the area of the house after it's dried and that's a pain.


I used my homemade "Grass-O-Matic" static grass applicator to first add a layer of 2mm (6" HO scale) long "late summer green" using a 50/50 mix of white glue/water.


I went back and added here and there a mix of 2/4/6mm static grass of various colors to add some different texture.  I then took a screwdriver and randomly pressed down the grass all over to give it a more realistic look.


Here I've removed the paper piece since the glue has worked its way under and would be a real joy to try and take it off once dried.  You can see the area were the house will sit.


Boy, am I tempted to put Grandpa's house on the diorama right away!  Not a good idea as it will get glue on the bottom.  I guess I'll just have to be patient and wait for the glue to dry.  Once the glue is dry I'll place the house on the diorama for the balance of landscaping.

Posting No. 46 - Time for a Trim

After viewing Posting No. 45 on the stairs my good friend and model railroader Scott Perry emailed me saying "Not a critique...just an observation...the stair step boards are too long for the stringers.  Looks funny on the house."  I looked at the stairs again and he is correct!  I measured the front stairs and they are OK with a 3" HO scale overhang; however, the rear stairs have a foot of overhang!


The stairs are attached with the self-adhesive coating so it wasn't a problem to carefully pry them off the stringers.  Now how to trim these sticky devils without them sticking to everything?  My handy-dandy Northwest Short Line "The Chopper" to the rescue!  If you don't have one of these tools I strongly suggest that you purchase one.  I set up the stop for a 3" overhang and shop the stair steps (treads) to length.


It was an easy matter to re-attach the steps by simply aligning them and pressing down.  Here is the result which is much better!  Thank you, Scott!


Scott also noted that most houses this style have "box style" steps.  It looks like the makers of this kit took a little short cut by supplying "open" style steps; however, they will work in this case since we're not trying to be historically accurate.

What's next?  I'm working on a quick diorama for some photos.

Tuesday, May 29, 2012

Posting No. 45 - Taking the Right Steps & Shingle Repair

SOMEBODY messed up my work area and I can't work like this - AHHHHH!!!  It must be those darn Gremlins that sneak around at night time, hide my stuff, and mess up my work area!


Twenty minutes of work and now I'm back where I can get some work done!


Even though the kit instructions said that the steps were to be installed early in the process I knew that I would knock them off a dozen times during while working on later instructions.  I waited until the last so I'll only know them off a half dozen times!

 Here are the steps that I cut out and touch up painted on the sides that show using the Testors(tm) flat gray.  I had cut out and painted the stringers "dirty white" previously.


First I glue the front porch stringers to the porch using white glue.  I'm doing this on my cutting mat so I can make sure that they are at a right angle to to porch.


Next I apply the steps to the stringers using the supplied self-adhesive on the bottom of the steps.  After positioning the steps I press them into place firmly.


Now I'll add a little weathering using brown, tan & black weathering powders.


Now for the steps on the back porch.  First I glue the stringers in place.


Next I'll add......wait a minute.....one of the steps is missing!  I spend 10 minutes looking for it and never find it.  I cut out a step from the leftover wood using the existing steps as a template and then paint it.  Here I've added the steps.  Can you tell which one is my "home made" step?


And now a little weathering using the same colors.  I go for a little dirtier as this is usually the way Grandpa goes into the house after being out in the "back 40".  Grandma insists he come in through the kitchen and remove his boots!


With the steps completed I wanted to do some general weathering and spotted......what's this? - a poor job of shingling!!!  There should have been another entire row of shingles here!  This has to be fixed!


I use my hobby knife to carefully pry under and lift up the roof cap.  Now I have enough clearance to install another row of shingles.


I cut a row to fit, add glue, insert, and hold down until the glue dries.  Now that is much better!


Do you know what?  The only things I have left to do are to finish and install the outside cellar door and do final inspection and touch up!  But before anyone gets too excited (Kevin) I want to make a little diorama and take the structure outside for pictures before I pack it up for shipment.

Monday, May 28, 2012

Posting No. 44 - Today I was the Chairman

No, not that kind of Chairman - a chair-man!  I'm fairly sure that Grandpa Sam and Grandma liked to sit on the front porch; however, Grandpa didn't want anybody calling him "old" so he didn't want any rocking chairs!  Actually, I didn't have any rocking chairs (but did have some kitchen style chairs) so I made up that story.  Kevin, when you get the structure if you want rockers.................

Here you can see the chairs with a little table to hold their iced tea and newspaper (not shown).  I already had the chairs "in stock" and made the table out of a wooden barrel and some styrene siding.   It was a nice place for Grandpa and Grandma to sit and enjoy the day!


So that you don't think I've been lazy, behind the scenes I'm making more flower pots.

Saturday, May 26, 2012

Posting No. 43 - Got Pot?

No, not THAT kind of pot - I'm talking about a flower pot!  I was tired on working on the main structure so now I'm going to work on details.  What better way to dress up Grandpa Sam's then with a few flowers.  I could buy those $$$$ HO scale flower pots with flowers included; however, I figured that I could do better.

Since the Mrs. likes to go to Michael's Crafts and she likes me to go along I always keep a "modeler's eye" out for things that I can use.  The last time we were in Michael's I spied the following:


The pack of (23) was $3.00 and I thought hummmm - I bet I can make flower pots out of these!  I bought the pack with Kevin's structure in mind and we'll see how they work.  First we'll measure them. In HO scale size they are 5-1/2ft high by 1-1/2ft wide at the largest end.  The 1-1/2ft is OK, but we'll need to cut it down to size.


I put a tooth pick though the center and used my felt tip pen to mark a line at the 1-1/2ft distance.


How to cut this? - with my Dremel tool and a reinforced cut off disk.  I clamp the Dremel to my table for stability.  SAFETY NOTE:  ALWAYS USE PROPER EYE PROTECTION AND EXTREME CARE WHEN USING POWER TOOLS.


It only took a minute and here is the result with the cut completed.  We'll keep the long piece and perhaps cut it down to have a narrower opening additional flower pot.


I finish off the rough edges with sandpaper and sand the entire pot outside and inside with sandpaper for a rough surface for the paint.  I've mounted it on the end of a dowel rod to hold it for painting with Testors(tm) "Flat Brown".


While the paint is drying (forgot to get a picture of the painted pot) we'll get the flowers ready.  It just so happens that I have some Noch "flowering bushes".   They aren't cheap, but a little goes a long way.


The pack contains red, white & yellow.  I choose red.  Here is an individual bush.


The bush is way too big for our pot, so I trim off some (that I save for later) and insert it into our pot.


I like!  Just for fun we'll put it on the front porch temporarily to see how it looks.  It looks nice and at only pennies per pot I'll need to make some more with different color flowers.  Kevin, did Grandpa or Grandma have a favorite color flower?


I need to make some more pots and misc things.  Stay tuned for more!