It's time to start making this look like a house! The first thing I need to do is organize and get my stuff ready. Starting at the top of the picture I've got toothpicks, white glue, a piece of hardboard with blue tape (for my glue), the first pieces to assemble, the instructions, high tech holding devices (rubber bands) and a square. Why such a large square? - because most of my modeling tools are packed!
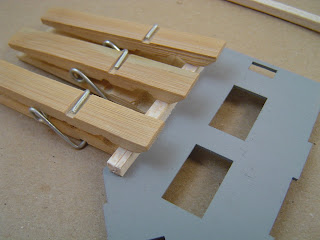
I'll start by gluing some reinforcement stock (1/4" x 1/4") to the corners. Why such big stock? - because it's all I could find! Notice high tech holding tools #2 - clothes pins.
I use a toothpick to apply the white glue to both the wall section and the reinforcement wood.
Next I carefully align the corner piece (reinforcement wood) to the edge of the wall section and apply the clamps. Care must be used here as the wood can shift when the clamps are applied.
I repeat the process for the other corner. It's important that you pay attention when applying these corner reinforcement pieces. On a structure I built previously I attached the corner reinforcement pieces to two adjacent corners ......opps! I had to remove one and it didnt' want to come off without a fight!
Notice that the other wall is a different width at the top than at the bottom. This can create a problem when trying to clamp everything together. Both wall sections are set aside for the glue to dry.
First we'll dry fit the wall sections together to make sure that everything fits, which it does. These Laser Art structure are quality products and I've yet to have a problem with them.
Now it would appear from this picture that I'm assembling all four walls, which isn't the case. I'm only gluing the front and right walls. The other walls are just dry fitted in place to allow for the rubber bands to clamp properly. What are the paint thinner bottles doing inside? Well, since I've PACKED my magnetic squaring jig the are applying pressure to the walls against the square. Now we have to wait for the glue to dry ...zzzzzzzzzzzzzzzzz.
And I'm back! Now I'll glue the front wall to the other wall. And we wait for the glue to dry.................
Everything appears sturdy and square so the first thing I do is put a check mark on the instructions that I've completed this portion. Here I'm adding a wall on the right side front of the portion just completed. Notice I'm using the square to insure a 90 degree angle.
Another wall is attached to the right front. This time instead of attaching the corner reinforcement first I add it as I attach the wall. It's not contacting the wall at the top; however, it still will provide enough additional strength for the walls and joint. I also added the corner reinforcements to the left wall.
With the glue for the two side walls dry I attach the next section connecting the two. The horizontal 1/4" x 1/4" piece is temporary to hold the front wall in correct position. Can you believe that there's still ANOTHER section to add to the front of the section we just added? Nobody can say that this is your standard "4 walls and a roof" structure!
That's it for today. I want to let all of the glue dry overnight before proceeding. Since it's the weekend I don't know how much time I'll get to work on it with my "HoneyDo" list.


Very cool Rick! I'm learning a few things already!
ReplyDeleteKevin,
ReplyDeleteI'm glad to hear that you are finding the blog helpful! I'm enjoying the build!
Rick